如何在 Ubuntu 上安装Vendure 22.04
介绍
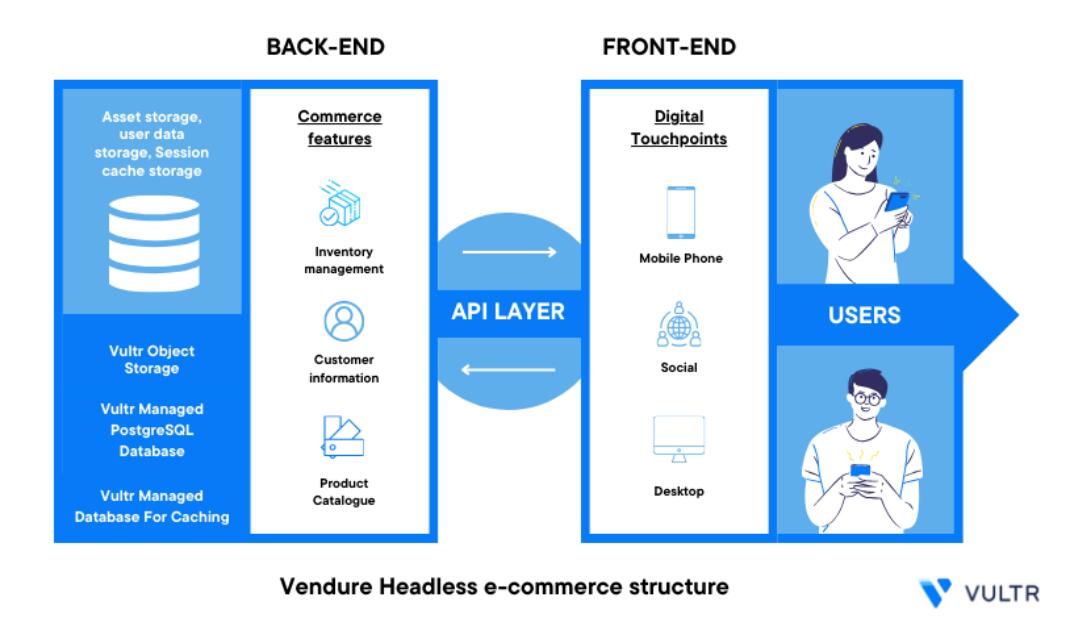
Vendure 是一个开源的无头商务框架,允许构建由 Node.js、TypeScript 和 GraphQL 提供支持的生产就绪电子商务应用程序。它的工作原理是通过 API 公开所有应用程序功能。Vendure 在 GraphQL API 上公开了所有商店前端功能,并且不提供默认的商店前端界面。这提高了开发人员的灵活性,因为它允许您使用任何前端技术创建店面。
本文介绍如何在 Ubuntu 22.04 Vultr 服务器上部署 Vendure。您需要将该框架与 Vultr Object Storage(PostgreSQL 托管数据库)和 Redis® 集成,以构建生产就绪型应用程序。
先决条件
准备工作:
- 在 Vultr 上购买 Ubuntu 22.04 服务器
- 部署 Vultr Managed Database for PostgreSQL
- 部署用于缓存的 Vultr 托管数据库
- 部署 Vultr 对象存储
- 设置指向服务器的域 A 记录
- 使用 SSH,以 root 身份登录服务器
- 创建具有 sudo 权限的非 root 用户
- 切换到新的 sudo 用户帐户
# su example_user - 安装 PostgreSQL 数据库服务器
- 在服务器上安装 s3cmd:
$ sudo apt install s3cmd - 配置 s3cmd 以使用 Vultr 对象存储
安装Node.js
Vendure 需要 Node.js 版本 16.x 或更高版本。按照以下步骤中的说明安装最新的 Node.js 版本。
- 更新服务器
$ sudo apt update - 创建目录
keyrings$ sudo mkdir -p /etc/apt/keyrings - 下载节点源 GPG 密钥并将其添加到服务器密钥
curl -fsSL https://deb.nodesource.com/gpgkey/nodesource-repo.gpg.key | sudo gpg --dearmor -o /etc/apt/keyrings/nodesource.gpg - 将Node.js存储库添加到源列表中。替换为您想要的版本
apt20NODE_MAJOR=20 echo "deb [signed-by=/etc/apt/keyrings/nodesource.gpg] https://deb.nodesource.com/node_$NODE_MAJOR.x nodistro main" | sudo tee /etc/apt/sources.list.d/nodesource.list - 更新服务器程序包
$ sudo apt update - 安装Node.js
$ sudo apt install nodejs -y - 验证已安装的Node.js版本
$ nodejs --version输出:
v20.5.1
设置本地 PostgreSQL 数据库服务器
要在服务器上安装 Vendure,您需要将应用程序数据临时保存在本地 PostgreSQL 数据库服务器上。稍后,您可以先将数据迁移到 Vultr Managed Database for MySQL,然后再将应用程序部署到生产环境。如下所述设置本地数据库。
在 PostgreSQL 上启用密码身份验证
- 验证已安装的 PostgreSQL 版本
$ psql --version输出:
psql (PostgreSQL) 14.16 (Ubuntu 14.16-0ubuntu0.22.04.1) - 根据您的 PostgreSQL 版本,使用文本编辑器编辑文件,例如
pg_hba.confnano$ sudo nano /etc/postgresql/14/main/pg_hba.conf - 查找以下配置行
# "local" is for Unix domain socket connections only local all all peer - 将身份验证方法更改为
peermd5local all all md5保存并关闭文件
- 重新启动 PostgreSQL 数据库服务器
$ sudo systemctl restart postgresql
创建新的 PostgreSQL 数据库
- 登录PostgreSQL数据库服务器
$ sudo -u postgres psql - 创建新数据库
postgres=# CREATE DATABASE vendure_db;输出:
CREATE DATABASE - 使用强密码创建新的数据库用户
postgres=# CREATE USER vendure_user WITH ENCRYPTED PASSWORD 'strong-password';输出:
CREATE ROLE - 授予用户对 Vendure 数据库的完全权限
postgres=# GRANT ALL PRIVILEGES ON DATABASE vendure_db TO vendure_user;输出:
GRANT - 退出 PostgreSQL 控制台
postgres-# \q
安装 Vendure
- 使用 Node.js 工具,使用该工具安装 Vendure。
npx@vendure/create$ npx @vendure/create vendure-app - 回复每个安装提示,如下所述按 安装软件包Y
@vendure/createNeed to install the following packages: @vendure/create@2.0.2 Ok to proceed? (y) y选择为正在使用的数据库
Postgres◆ Which database are you using? │ ○ MySQL │ ○ MariaDB │ ● Postgres │ ○ SQLite │ ○ SQL.js按下可设置为 PostgreSQL 主机名ENTER
localhost◆ What's the database host address? │ localhost按下可保留为 PostgreSQL 端口号ENTER
5432◆ What port is the database listening on? │ 5432输入您之前创建的 PostgreSQL 数据库名称
 ◆  What's the name of the database?
 │  vendure_db
按下可将 PostgreSQL 架构设置为 publicENTER
    What's the schema name we should use?
 │  public
输入您之前创建的 PostgreSQL 用户
 ◇  What's the database user name?
 │  vendure_user
输入您之前创建的 PostgreSQL 数据库用户密码
◇ What's the database password? │ strong-password按下可保留为默认管理员用户名。将用户名更改为所需值ENTER
superadmin◇ What identifier do you want to use for the superadmin user? │ superadmin │输入您想要的超级管理员用户名或按下以使用默认密码ENTER
 ◇  What password do you want to use for the superadmin user?
 │  superadmin
 │
Select and press to populate the database with sample product data
yesENTER◆ Populate with some sample product data? │ ● yes │ ○ no - When successful, the installation process should complete with the following output:
◇ Server successfully initialized and populated │ ◇ ──────────────────────────────────────────╮ │ │ │ Success! Created a new Vendure server at: │ │ │ │ │ │ /home/example_user/vendure-app │ │ │ │ │ │ We suggest that you start by typing: │ │ │ │ │ │ $ cd vendure-app │ │ $ npm run dev │ │ │ ├─────────────────────────────────────────────╯ │ └ Happy hacking! - List files in your working directory
$ lsOutput:
vendure-appVerify that a new directory is available on the list
vendure-app
Set Up the Vultr Managed Database for PostgreSQL
- Log in to your Vultr Managed Database for PostgreSQL. Replace , , with your actual values
vultradmin1234host.vultrdb.com$ psql -h host.vultrdb.com -d postgres -U vultradminOr, copy and use your database connection string from your Vultr Managed Database for PostgreSQL control panel

- When logged in, create a new database
defaultdb=> CREATE DATABASE venduredb;Output:
CREATE DATABASE - Quit PostgreSQL console
defaultdb=> \q
将本地 PostgreSQL 数据库数据迁移到 Vultr PostgreSQL 托管数据库
- 使用之前创建的用户和数据库将 PostgreSQL 数据库备份到文件
venduredb.sql$ pg_dump --no-owner -U vendure_user -d vendure_db -W > venduredb.sql出现提示时,输入您之前设置的正确的 Vendure 用户数据库密码
- 使用备份文件,将数据库还原到 Vultr PostgreSQL 托管数据库。将 ,, 替换为您的实际详细信息。
host.vultrdb.comvendure_dbvultradmin$ psql -h host.vultrdb.com -d vendure_db -U vultradmin < venduredb.sql - 恢复完成后,访问 Vultr Managed Database for PostgreSQL
$ psql -h host.vultrdb.com -d vendure_db -U vultradmin - 查看 Vendure 数据库表
vendure_db=> \dt输出:
                           List of relations
  Schema |                    Name                     | Type  | Owner
 --------+---------------------------------------------+-------+-------
  public | address                                     | table | vultradmin
  public | administrator                               | table | vultradmin
  public | asset                                       | table | vultradmin
  public | asset_channels_channel                      | table | vultradmin
  public | asset_tags_tag                              | table | vultradmin
  public | authentication_method                       | table | vultradmin
  public | channel                                     | table | vultradmin
  public | collection                                  | table | vultradmin
  public | collection_asset                            | table | vultradmin
  public | collection_channels_channel                 | table | vultradmin
  public | collection_closure                          | table | vultradmin
  public | collection_product_variants_product_variant | table | vultradmin
  public | collection_translation                      | table | vultradmin
  public | customer                                    | table | vultradmin
  public | customer_channels_channel                   | table | vultradmin
  public | customer_group                              | table | vultradmin
  public | customer_groups_customer_group              | table | vultradmin
  public | facet                                       | table | vultradmin
  public | facet_channels_channel                      | table | vultradmin
 :
Enter 退出 PostgreSQL 寻呼机Q
- 退出 PostgreSQL 控制台
# \q - 在 Vultr 客户门户中,下载 Vultr Managed Database for PostgreSQL 签名证书文件
ca-certificate.crt
- 下载后,在终端会话中使用文件并将其上传到服务器
scp$ scp ca-certificate.crt example_user@SERVER-IP:/home/example_user/ - 上传时,请验证证书文件在用户主目录中是否可用
$ ls输出:
ca-certificate.crt - 将证书文件移动到目录中。
/usr/local/share/ca-certificates/$ sudo mv ca-certificate.crt /usr/local/share/ca-certificates/ - 编辑文件
vendure-config.ts$ nano src/vendure-config.ts - 从文件顶部导入方法
readFileSyncnode:fsimport { readFileSync } from 'node:fs'; - 将以下声明添加到该部分
dbConnectionOptionsssl: { rejectUnauthorized: true, ca: readFileSync('/usr/local/share/ca-certificates/ca-certificate.crt').toString(), },您编辑的部分应如下所示:
dbConnectionOptionsdbConnectionOptions: { type: 'postgres', // See the README.md "Migrations" section for an explanation of // the `synchronize` and `migrations` options. synchronize: false, migrations: [path.join(__dirname, './migrations/*.+(js|ts)')], logging: false, database: process.env.DB_NAME, schema: process.env.DB_SCHEMA, host: process.env.DB_HOST, port: +process.env.DB_PORT, username: process.env.DB_USERNAME, password: process.env.DB_PASSWORD, ssl: { rejectUnauthorized: true, ca: readFileSync('/usr/local/share/ca-certificates/ca-certificate.crt').toString(), }, },保存并关闭文件。
切换 Vendure PostgreSQL 数据库配置
- 切换到目录
vendure-app$ cd vendure-app - 编辑文件
.env$ nano .env - 使用 Vultr Managed Database for PostgreSQL 详细信息更新以下现有变量
 DB_HOST=host.vultrdb.com
 DB_PORT=1234
 DB_NAME=vendure_db
 DB_USERNAME=vultradmin
 DB_PASSWORD=managed-db-password
Save and close the file.
Store Vendure Assets in Object Storage
Create a New Bucket
- Log in to the Vultr customer portal
- Navigate to Products -> Cloud Storage -> Object Storage.

- Access your Vultr Object Storage control panel

- Navigate to Buckets

- Click the Create Bucket button, and assign the bucket a name of your choice. For example
vendure
Sync the Assets to Vultr Object Storage
- View your working directory
$ pwdVerify that you're operating in the directory, or switch to the directory
vendure-app$ cd vendure-app - Using the tool, synchronize the Vendure assets directory to your Vultr Object Storage bucket
s3cmd$ s3cmd sync static/assets/ s3://vendure/Verify that the file transfer completes successfully
Add the Vultr Object Storage Configuration
- Using , install the and packages
npm@aws-sdk/client-s3@aws-sdk/lib-storage$ npm install @aws-sdk/client-s3 @aws-sdk/lib-storage --save - Edit the file
environment.d.ts$ nano src/environment.d.ts - Add the following configurations within the function
ProcessEnvS3_ENDPOINT: string; S3_ACCESS_KEY_ID: string; S3_SECRET_ACCESS_KEY: string; S3_BUCKET_NAME: string;Save and close the file.
Your edited file should look like the one below:
namespace NodeJS { interface ProcessEnv { APP_ENV: string; COOKIE_SECRET: string; SUPERADMIN_USERNAME: string; SUPERADMIN_PASSWORD: string; DB_HOST: string; DB_PORT: number; DB_NAME: string; DB_USERNAME: string; DB_PASSWORD: string; DB_SCHEMA: string; S3_ENDPOINT: string; S3_ACCESS_KEY_ID: string; S3_SECRET_ACCESS_KEY: string; S3_BUCKET_NAME: string; } - Edit the file:
.env$ nano .env - Add the following environment variables to the file. Replace the placeholder values with your actual Vultr Object Storage details
 S3_ENDPOINT=https://YOUR_VULTR_OBJECT_STORAGE_HOST
 S3_ACCESS_KEY_ID=YOUR_VULTR_OBJECT_STORAGE_ACCESS_KEY
 S3_SECRET_ACCESS_KEY=YOUR_VULTR_OBJECT_STORAGE_SECRET_KEY
 S3_BUCKET_NAME=YOUR_VULTR_OBJECT_STORAGE_BUCKET_NAME
Save and close the file.
You can view your Vultr Object Storage details on the instance overview section

- Back up the original file
vendure-config.ts$ mv src/vendure-config.ts src/vendure-config.ORIG - Create the file again
$ nano src/vendure-config.ts - Add the following updated contents to the file. Replace with your actual domain
example.comimport { dummyPaymentHandler, DefaultJobQueuePlugin, DefaultSearchPlugin, VendureConfig, } from '@vendure/core'; import { AssetServerPlugin, configureS3AssetStorage } from '@vendure/asset-server-plugin'; import { defaultEmailHandlers, EmailPlugin } from '@vendure/email-plugin'; import { AdminUiPlugin } from '@vendure/admin-ui-plugin'; import 'dotenv/config'; import path from 'path'; const IS_DEV = process.env.APP_ENV === 'dev'; export const config: VendureConfig = { apiOptions: { port: 3000, adminApiPath: 'admin-api', shopApiPath: 'shop-api', // The following options are useful in development mode, // but are best turned off for production for security // reasons. ...(IS_DEV ? { adminApiPlayground: { settings: { 'request.credentials': 'include' } as any, }, adminApiDebug: true, shopApiPlayground: { settings: { 'request.credentials': 'include' } as any, }, shopApiDebug: true, } : {}), }, authOptions: { tokenMethod: ['bearer', 'cookie'], superadminCredentials: { identifier: process.env.SUPERADMIN_USERNAME, password: process.env.SUPERADMIN_PASSWORD, }, cookieOptions: { secret: process.env.COOKIE_SECRET, }, }, dbConnectionOptions: { type: 'postgres', // See the README.md "Migrations" section for an explanation of // the `synchronize` and `migrations` options. synchronize: false, migrations: [path.join(__dirname, './migrations/*.+(js|ts)')], logging: false, database: process.env.DB_NAME, schema: process.env.DB_SCHEMA, host: process.env.DB_HOST, port: +process.env.DB_PORT, username: process.env.DB_USERNAME, password: process.env.DB_PASSWORD, }, paymentOptions: { paymentMethodHandlers: [dummyPaymentHandler], }, // When adding or altering custom field definitions, the database will // need to be updated. See the "Migrations" section in README.md. customFields: {}, plugins: [ AssetServerPlugin.init({ route: 'assets', assetUploadDir: path.join(__dirname, '../static/assets'), assetUrlPrefix: IS_DEV ? undefined : 'https://example.com/assets/', storageStrategyFactory: configureS3AssetStorage({ bucket: process.env.S3_BUCKET_NAME, credentials: { accessKeyId: process.env.S3_ACCESS_KEY_ID, secretAccessKey: process.env.S3_SECRET_ACCESS_KEY, }, nativeS3Configuration: { endpoint: process.env.S3_ENDPOINT, forcePathStyle: true, signatureVersion: 'v4', region: 'eu-west-1', }, }), }), DefaultJobQueuePlugin.init({ useDatabaseForBuffer: true }), DefaultSearchPlugin.init({ bufferUpdates: false, indexStockStatus: true }), EmailPlugin.init({ devMode: true, outputPath: path.join(__dirname, '../static/email/test-emails'), route: 'mailbox', handlers: defaultEmailHandlers, templatePath: path.join(__dirname, '../static/email/templates'), globalTemplateVars: { // The following variables will change depending on your storefront implementation. // Here we are assuming a storefront running at http://localhost:8080. fromAddress: '"example" <noreply@example.com>', verifyEmailAddressUrl: 'http://localhost:8080/verify', passwordResetUrl: 'http://localhost:8080/password-reset', changeEmailAddressUrl: 'http://localhost:8080/verify-email-address-change' }, }), AdminUiPlugin.init({ route: 'admin', port: 3002, }), ], };Save and close the file.
The above configuration imports the and assets to Vendure. Then, it defines the Vendure URL in the section.
configureS3AssetStorageasset-server-pluginexample.comAssetServerPlugin.init({
Store the Job Queue and Session Cache in Redis®
Vendure keeps the job queue in the PostgreSQL database by default. To store the jobs in a Vultr Managed Database for Caching, use the BullMQ job queue plugin as described in the steps below.
Set Up the Job Queue
- Install the BullMQ job queue plugin
$ npm install @vendure/job-queue-plugin bullmq@1 --save - Edit the file
environment.d.ts$ nano src/environment.d.ts - Add the following declarations to the interface after your directives
ProcessEnvS3REDIS_HOST: string; REDIS_PORT: number; REDIS_USERNAME: string; REDIS_PASSWORD: string;Save and close the file.
- Edit the file
vendure-config.ts$ nano src/vendure-config.ts - Add the import directive at the top of the file
BullMQJobQueuePluginimport { BullMQJobQueuePlugin } from '@vendure/job-queue-plugin/package/bullmq';In the section, find the initialization directive
plugins:DefaultJobQueuePluginDefaultJobQueuePlugin.init({ useDatabaseForBuffer: true }),Replace it with the following declarations
BullMQJobQueuePluginBullMQJobQueuePlugin.init({ connection: { port: process.env.REDIS_PORT, host: process.env.REDIS_HOST, username: process.env.REDIS_USERNAME, password: process.env.REDIS_PASSWORD, tls: {}, } }),Save and close the file.
- Edit the file
.env$ nano .env - Add the following environment variables at the end of the file. Replace the placeholder values with your Vultr Managed Database for Caching details
 REDIS_HOST=host.vultrd.com
 REDIS_PORT=1234
 REDIS_USERNAME=admin
 REDIS_PASSWORD=strong-password
You can find your Vultr Managed Database for Caching details on your instance overview section

Configure Session Cache
Vendure stores the session object cache in your system memory. It's fast and suitable for a single-instance deployment. However, for horizontal scaling or multi-instance deployment, you must store the session cache to an external data store such as a Vultr Managed Database for Caching. To enable Redis®, create a custom session cache strategy as described below.
- Create a new file in the directory
redis-session-cache-strategy.tsplugins$ nano src/plugins/redis-session-cache-strategy.ts - Add the following configurations to the file
 import { CachedSession, Logger, SessionCacheStrategy, VendurePlugin } from '@vendure/core';
 import { Redis, RedisOptions } from 'ioredis';

 export interface RedisSessionCachePluginOptions {
   namespace?: string;
   redisOptions?: RedisOptions;
 }
 const loggerCtx = 'RedisSessionCacheStrategy';
 const DEFAULT_NAMESPACE = 'vendure-session-cache';

 export class RedisSessionCacheStrategy implements SessionCacheStrategy {
   private client: Redis;
   constructor(private options: RedisSessionCachePluginOptions) {}

   init() {
     this.client = new Redis(this.options.redisOptions as RedisOptions);
     this.client.on('error', err => Logger.error(err.message, loggerCtx, err.stack));
   }

   async get(sessionToken: string): Promise<CachedSession | undefined> {
     const retrieved = await this.client.get(this.namespace(sessionToken));
     if (retrieved) {
       try {
         return JSON.parse(retrieved);
       } catch (e: any) {
         Logger.error(`Could not parse cached session data: ${e.message}`, loggerCtx);
       }
     }
   }

   async set(session: CachedSession) {
     await this.client.set(this.namespace(session.token), JSON.stringify(session));
   }

   async delete(sessionToken: string) {
     await this.client.del(this.namespace(sessionToken));
   }

   clear() {
     // not implemented
   }

   private namespace(key: string) {
     return `${this.options.namespace ?? DEFAULT_NAMESPACE}:${key}`;
   }
 }

 @VendurePlugin({
   configuration: config => {
     config.authOptions.sessionCacheStrategy = new RedisSessionCacheStrategy(
       RedisSessionCachePlugin.options,
     );
     return config;
   },
 })
 export class RedisSessionCachePlugin {
   static options: RedisSessionCachePluginOptions;
   static init(options: RedisSessionCachePluginOptions) {
     this.options = options;
     return this;
   }
 }
Save and close the file
- Edit the file
vendure-config.ts$ nano src/vendure-config.ts - Add the directive to the import section
RedisSessionCachePluginimport { RedisSessionCachePlugin } from './plugins/redis-session-cache-strategy';Within the section, add the following code after to initialize the
Plugins: [AdminUiPlugin.init(...)RedisSessionCachePluginRedisSessionCachePlugin.init({ redisOptions: { port: process.env.REDIS_PORT, host: process.env.REDIS_HOST, username: process.env.REDIS_USERNAME, password: process.env.REDIS_PASSWORD, tls: {}, } }),Save and close the file.
Build for Vendure Production
- Edit the file
.env$ nano .env - Change the value from to
APP_ENVdevproductionAPP_ENV=productionSave and close the file.
- Install the Vendure harden plugin that locks down your schema and protects your shop API from malicious queries
$ npm install @vendure/harden-plugin --save - Edit the file
vendure-config.ts$ nano src/vendure-config.ts - Add the following import directive to the section
harden pluginimportimport { HardenPlugin } from '@vendure/harden-plugin';Within the section, add the following code to initialize the harden plugin
Plugins:HardenPlugin.init({ maxQueryComplexity: 500, apiMode: IS_DEV ? 'dev' : 'prod', }),Save and close the file.
The edited file should look like the one below:
vendure-config.tsimport { dummyPaymentHandler, DefaultJobQueuePlugin, DefaultSearchPlugin, VendureConfig, } from '@vendure/core'; import { defaultEmailHandlers, EmailPlugin } from '@vendure/email-plugin'; import { AssetServerPlugin, configureS3AssetStorage } from '@vendure/asset-server-plugin'; import { AdminUiPlugin } from '@vendure/admin-ui-plugin'; import { BullMQJobQueuePlugin } from '@vendure/job-queue-plugin/package/bullmq'; import { RedisSessionCachePlugin } from './plugins/redis-session-cache-strategy'; import { HardenPlugin } from '@vendure/harden-plugin'; import 'dotenv/config'; import path from 'path'; import { readFileSync } from 'node:fs'; const IS_DEV = process.env.APP_ENV === 'dev'; export const config: VendureConfig = { apiOptions: { port: 3000, adminApiPath: 'admin-api', shopApiPath: 'shop-api', // The following options are useful in development mode, // but are best turned off for production for security // reasons. ...(IS_DEV ? { adminApiPlayground: { settings: { 'request.credentials': 'include' } as any, }, adminApiDebug: true, shopApiPlayground: { settings: { 'request.credentials': 'include' } as any, }, shopApiDebug: true, } : {}), }, authOptions: { tokenMethod: ['bearer', 'cookie'], superadminCredentials: { identifier: process.env.SUPERADMIN_USERNAME, password: process.env.SUPERADMIN_PASSWORD, }, cookieOptions: { secret: process.env.COOKIE_SECRET, }, }, dbConnectionOptions: { type: 'postgres', // See the README.md "Migrations" section for an explanation of // the `synchronize` and `migrations` options. synchronize: false, migrations: [path.join(__dirname, './migrations/*.+(js|ts)')], logging: false, database: process.env.DB_NAME, schema: process.env.DB_SCHEMA, host: process.env.DB_HOST, port: +process.env.DB_PORT, username: process.env.DB_USERNAME, password: process.env.DB_PASSWORD, ssl: { rejectUnauthorized: true, ca: readFileSync('/usr/local/share/ca-certificates/ca-certificate.crt').toString(), }, }, paymentOptions: { paymentMethodHandlers: [dummyPaymentHandler], }, // When adding or altering custom field definitions, the database will // need to be updated. See the "Migrations" section in README.md. customFields: {}, plugins: [ AssetServerPlugin.init({ route: 'assets', assetUploadDir: path.join(__dirname, '../static/assets'), assetUrlPrefix: IS_DEV ? undefined : 'https://example.hisman.org/assets/', storageStrategyFactory: configureS3AssetStorage({ bucket: process.env.S3_BUCKET_NAME, credentials: { accessKeyId: process.env.S3_ACCESS_KEY_ID, secretAccessKey: process.env.S3_SECRET_ACCESS_KEY, }, nativeS3Configuration: { endpoint: process.env.S3_ENDPOINT, forcePathStyle: true, signatureVersion: 'v4', region: 'eu-west-1', }, }), }), RedisSessionCachePlugin.init({ redisOptions: { port: process.env.REDIS_PORT, host: process.env.REDIS_HOST, username: process.env.REDIS_USERNAME, password: process.env.REDIS_PASSWORD, tls: {}, } }), BullMQJobQueuePlugin.init({ connection: { port: process.env.REDIS_PORT, host: process.env.REDIS_HOST, username: process.env.REDIS_USERNAME, password: process.env.REDIS_PASSWORD, tls: {}, } }), HardenPlugin.init({ maxQueryComplexity: 500, apiMode: IS_DEV ? 'dev' : 'prod', }), DefaultSearchPlugin.init({ bufferUpdates: false, indexStockStatus: true }), EmailPlugin.init({ devMode: true, outputPath: path.join(__dirname, '../static/email/test-emails'), route: 'mailbox', handlers: defaultEmailHandlers, templatePath: path.join(__dirname, '../static/email/templates'), globalTemplateVars: { // The following variables will change depending on your storefront implementation. // Here we are assuming a storefront running at http://localhost:8080. fromAddress: '"example" <noreply@example.com>', verifyEmailAddressUrl: 'http://localhost:8080/verify', passwordResetUrl: 'http://localhost:8080/password-reset', changeEmailAddressUrl: 'http://localhost:8080/verify-email-address-change' }, }), AdminUiPlugin.init({ route: 'admin', port: 3002, }), ], }; - Build the Vendure application
$ npm run buildnpmwrites the build files to the directorydist
Run the Production Vendure App
- Install the package
PM2$ sudo npm install pm2 -g - Run the Vendure app server in cluster mode
$ pm2 start ./dist/index.js -i max - Run the Vendure app worker in cluster mode
$ pm2 start ./dist/index-worker.js -i maxOutput:
[PM2] Starting /home/user/vendure-app/dist/index-worker.js in cluster_mode (0 instance) [PM2] Done. ┌────┬─────────────────┬─────────────┬─────────┬─────────┬──────────┬────────┬──────┬───────────┬──────────┬──────────┬──────────┬──────────┐ │ id │ name │ namespace │ version │ mode │ pid │ uptime │ ↺ │ status │ cpu │ mem │ user │ watching │ ├────┼─────────────────┼─────────────┼─────────┼─────────┼──────────┼────────┼──────┼───────────┼──────────┼──────────┼──────────┼──────────┤ │ 0 │ index │ default │ 0.1.0 │ cluster │ 232015 │ 47s │ 0 │ online │ 0% │ 135.0mb │ user │ disabled │ │ 1 │ index-worker │ default │ 0.1.0 │ cluster │ 232052 │ 0s │ 0 │ online │ 0% │ 36.5mb │ user │ disabled │ └────┴─────────────────┴─────────────┴─────────┴─────────┴──────────┴────────┴──────┴───────────┴──────────┴──────────┴──────────┴──────────┘ - Generate and run a startup script to start PM2 when the server reboots
$ pm2 startupOutput:
[PM2] Init System found: systemd [PM2] To setup the Startup Script, copy/paste the following command: sudo env PATH=$PATH:/usr/bin /usr/lib/node_modules/pm2/bin/pm2 startup systemd -u example_user --hp /home/example_user - Save all the running processes
$ pm2 save - Using , test that your Vendure app runs on the default port
wget3000$ wget -S http://localhost:3000/admin/Output:
 --2023-08-18 10:30:28--  http://localhost:3000/admin/
 Resolving localhost (localhost)... ::1, 127.0.0.1
 Connecting to localhost (localhost)|::1|:3000... connected.
 HTTP request sent, awaiting response...
   HTTP/1.1 200 OK
   X-Powered-By: Express
   Vary: Origin
   Access-Control-Allow-Credentials: true
   Access-Control-Expose-Headers: vendure-auth-token
   Accept-Ranges: bytes
   Cache-Control: public, max-age=0
   Last-Modified: Fri, 18 Aug 2023 09:34:01 GMT
   ETag: W/"268-18a07fe9b82"
   Content-Type: text/html; charset=UTF-8
   Content-Length: 616
   Date: Fri, 18 Aug 2023 10:30:28 GMT
   Connection: keep-alive
   Keep-Alive: timeout=5
 Length: 616 [text/html]
 Saving to: ‘index.html’
If Vendure fails to run and listen on port . Start it using the following command to view the runtime log and catch any errors
3000$ npm run devOutput:
 [server] info 8/31/23, 8:25 PM - [BullMQJobQueuePlugin] Checking Redis connection...
 [server] info 8/31/23, 8:25 PM - [BullMQJobQueuePlugin] Connected to Redis ✔
 [server] info 8/31/23, 8:25 PM - [NestApplication] Nest application successfully started
 [server] info 8/31/23, 8:25 PM - [Vendure Server] ================================================
 [server] info 8/31/23, 8:25 PM - [Vendure Server] Vendure server (v2.0.6) now running on port 3000
 [server] info 8/31/23, 8:25 PM - [Vendure Server] ------------------------------------------------
 [server] info 8/31/23, 8:25 PM - [Vendure Server] Shop API:     http://localhost:3000/shop-api
 [server] info 8/31/23, 8:25 PM - [Vendure Server] Admin API:    http://localhost:3000/admin-api
 [server] info 8/31/23, 8:25 PM - [Vendure Server] Asset server: http://localhost:3000/assets
 [server] info 8/31/23, 8:25 PM - [Vendure Server] Dev mailbox:  http://localhost:3000/mailbox
 [server] info 8/31/23, 8:25 PM - [Vendure Server] Admin UI:     http://localhost:3000/admin
 [server] info 8/31/23, 8:25 PM - [Vendure Server] ================================================
When successful, verify that Vendure runs on port
3000
Configure Nginx as a Reverse Proxy
To securely access the Vendure app through your domain name, configure Nginx as a reverse proxy to handle connections to the backend port as described below.3000
- Install Nginx
$ sudo apt install nginx - Disable the default Nginx configuration
$ sudo unlink /etc/nginx/sites-enabled/default - Create a new Nginx virtual host configuration file
$ sudo nano /etc/nginx/sites-available/vendure - Add the following configurations to the file. Replace with your actual domain
example.comserver { listen 80; server_name example.com; location / { proxy_pass http://localhost:3000; proxy_http_version 1.1; proxy_set_header Upgrade $http_upgrade; proxy_set_header Connection 'upgrade'; proxy_set_header Host $host; proxy_set_header X-Real-IP $remote_addr; proxy_set_header X-Forwarded-Proto $scheme; proxy_set_header X-Forwarded-For $proxy_add_x_forwarded_for; proxy_cache_bypass $http_upgrade; } }Save and close the file.
- Enable the Nginx configuration file
$ sudo ln -s /etc/nginx/sites-available/vendure /etc/nginx/sites-enabled/ - Test your configurations from syntax errors
$ sudo nginx -t - Reload Nginx configurations to save changes
$ sudo nginx -s reload
Security
To secure Vendure for production use, allow Nginx to accept incoming connections on HTTP port and the HTTPS port . Then, securely redirect all HTTP requests to HTTPS by generating SSL certificates as described in the steps below.80443
Configure the Firewall
- Allow SSH port connection to the server
$ sudo ufw allow 'OpenSSH' - Allow the Nginx HTTP and HTTPS ports profile
$ sudo ufw allow 'Nginx Full' - Enable the firewall
$ sudo ufw enable - Verify the firewall status
$ sudo ufw statusOutput:
 Status: active

 To                         Action      From
 --                         ------      ----
 22/tcp                     ALLOW       Anywhere
 Nginx Full                 ALLOW       Anywhere
 22/tcp (v6)                ALLOW       Anywhere (v6)
 Nginx Full (v6)            ALLOW       Anywhere (v6)
Secure Vendure with Let's Encrypt SSL Certificates
- Using , install the Certbot Let's Encrypt client tool
snap$ sudo snap install --classic certbot - Create a symbolic link for the system wide Certbot command to
/usr/bin$ sudo ln -s /snap/bin/certbot /usr/bin/certbot - Generate your Let's Encrypt SSL certificate. Replace , with your domain, and email address respectively
example.comhello@example.com$ sudo certbot --nginx -d example.com -m hello@example.com --agree-tos - Verify that Certbot auto renews the SSL certificate upon expiry
$ sudo certbot renew --dry-run
Test the Application
- Using a web browser such as Chrome, access your Vendure shop administrator page
https://example.com/admin
Log in with the credentials you set earlier. When successful, the administrator dashboard should display
superadmin
- Navigate to the Inventory menu. Verify that all sample products display on the page. Try to update or delete any of them.

- Navigate to the Assets menu and upload a sample image

- 在 Vultr 客户门户会话中,查看 Vultr 对象存储桶。验证映像在存储桶中是否可用

- 除了 Vendure 管理员页面,还可以访问以下 GraphQL API 端点:
- 管理员 GraphQL API:
https://example.com/admin-api - 购买 GraphQL API:
https://example.com/shop-api
- 管理员 GraphQL API:
当您设计 Vendure 商店时,前端界面会随着您的产品和设计而激活。
结论
在本指南中,您安装了 Vendure 应用程序并将其部署到生产环境。您还将 Vendure 配置为使用 Vultr 对象存储、用于 PostgreSQL 的 Vultr 托管数据库和用于缓存的 Vultr 托管数据库。有关 Vendure 的更多信息,请访问官方文档。
1.本站主要是为了记录工作、学习中遇到的问题,可能由于本人技术有限,内容难免有纰漏,一切内容仅供参考。
2.本站部分内容来源互联网,如果有图片或者内容侵犯您的权益请联系我们删除!
3.本站所有原创作品,包括文字、资料、图片、网页格式,转载时请标注作者与来源。